
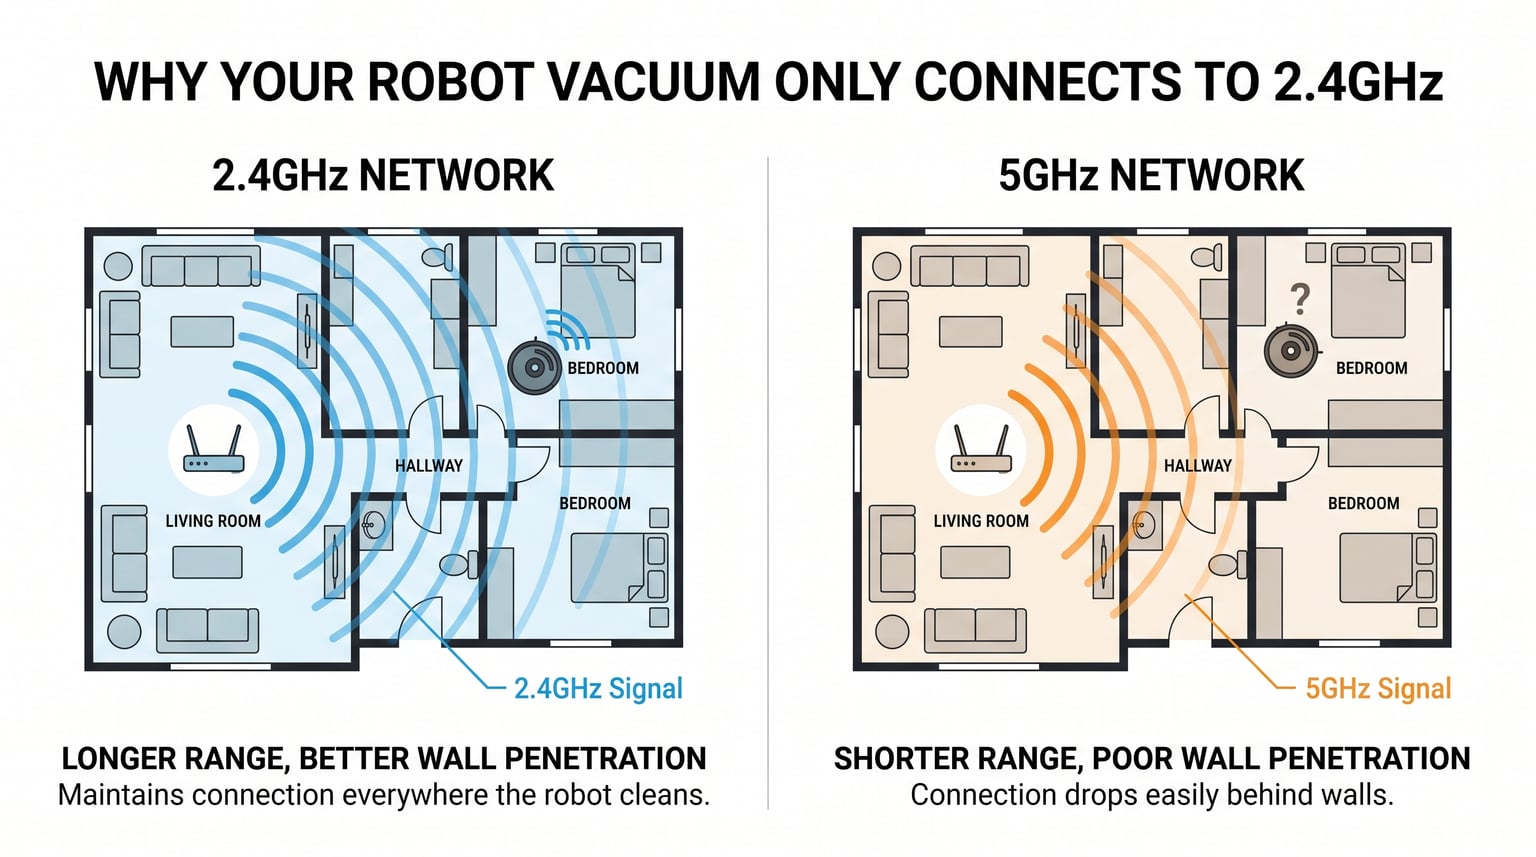
Your robot vacuum only connects to 2.4GHz Wi-Fi because most smart home and IoT devices are built with 2.4GHz-only Wi-Fi chips. The 2.4GHz frequency band travels farther, penetrates walls more effectively, and costs less to manufacture into small devices. Most robot vacuums on the market in 2026 still rely on this band for exactly these reasons.
If you have ever wondered why does my robot vacuum only connect to 2.4GHz and not 5GHz, you are not alone. Thousands of users run into this exact problem during setup. I have helped friends, family, and forum members troubleshoot this issue dozens of times. The frustration is real, especially when your router seems to only show one network name.
In this guide, I will break down exactly why this happens, what the difference between the two bands means for your cleaning routine, and how to get your vacuum connected even if your network setup seems impossible to work with.
Table of Contents
Why Does My Robot Vacuum Only Connect to 2.4GHz and Not 5GHz?
The short answer comes down to physics and economics. The 2.4GHz frequency band uses longer wavelengths that can push through walls, furniture, and floors far better than 5GHz signals. For a device that roams your entire house, this matters more than raw speed.
Think about what a robot vacuum actually needs from a Wi-Fi connection. It sends small bursts of data: its current location, a cleaning status update, maybe a map of your living room. None of this requires the massive bandwidth that 5GHz provides. What it does require is a connection that stays alive when the vacuum is under your bed, in a far corner of the basement, or navigating around your kitchen appliances.
The 2.4GHz band delivers that reliability. Its signal can reach roughly 150 feet indoors compared to about 50 feet for 5GHz. In a typical home with drywall, doors, and furniture, that range advantage becomes the difference between a connected vacuum and a dead vacuum.
There is also a manufacturing cost factor. Adding a 5GHz radio chip to a small IoT device increases production costs. Since robot vacuums already pack motors, sensors, batteries, and navigation systems into a compact disc, manufacturers often opt for the cheaper 2.4GHz-only chip to keep prices competitive.
Finally, 2.4GHz is the universal standard for smart home devices. Your smart plugs, doorbell cameras, thermostats, and light bulbs almost all use 2.4GHz. Robot vacuum manufacturers follow this convention so their devices work with the same network setup you already use for other smart home gear.
2.4GHz vs 5GHz: What is the Difference?
Wi-Fi operates on two main frequency bands, and each has distinct characteristics that affect how your devices perform. Understanding these differences helps you set up your home network the right way.
The 2.4GHz band covers a wider area and handles obstacles well. It supports speeds up to about 600 Mbps in ideal conditions, though real-world speeds are typically much lower. This band is also more crowded, meaning you may experience interference from neighbors’ networks, microwaves, and Bluetooth devices.
The 5GHz band delivers faster speeds, often exceeding 1 Gbps with modern routers. However, its range is shorter and it struggles to penetrate walls and solid objects. Devices on 5GHz need to be relatively close to the router to maintain a strong connection.
Here are the key differences:
- Indoor Range: 2.4GHz reaches approximately 150 feet indoors, while 5GHz reaches approximately 50 feet
- Wall Penetration: 2.4GHz has excellent wall penetration; 5GHz has poor to moderate penetration
- Maximum Speed: 2.4GHz supports up to 600 Mbps; 5GHz supports up to 1300+ Mbps
- Congestion: 2.4GHz is high (many devices share this band); 5GHz is lower (fewer devices use it)
- IoT Device Support: 2.4GHz has nearly universal support; 5GHz is limited to newer premium devices
- Interference Sources: 2.4GHz faces interference from microwaves, Bluetooth, and baby monitors; 5GHz has fewer interference sources
- Best For: 2.4GHz excels at coverage and reliability; 5GHz excels at speed and low-latency tasks
For a robot vacuum that travels throughout your home, the range and penetration of 2.4GHz clearly wins. The speed advantage of 5GHz is wasted on a device that sends tiny packets of map data.
5GHz vs 5G: Clearing Up the Confusion
One of the most common sources of confusion I see in forums is mixing up 5GHz Wi-Fi with 5G cellular service. These are completely different technologies that happen to share a similar-sounding name.
5GHz Wi-Fi refers to a frequency band used by your home router to send wireless internet to devices in your house. It has nothing to do with your cellular provider or mobile data plan.
5G cellular is the fifth generation of mobile network technology used by cell towers to deliver data to your phone when you are away from Wi-Fi. It operates on entirely different frequency ranges and uses a totally separate infrastructure.
When someone in a forum says they “only have 5G internet,” they usually mean their router is broadcasting a 5GHz Wi-Fi network. Understanding this distinction is the first step to solving your robot vacuum connection problem. Your robot vacuum cannot connect to 5G cellular either, but that is not what you are dealing with at home.
Do Any Robot Vacuums Support 5GHz Wi-Fi?
Yes, some newer and premium robot vacuums do support 5GHz connections. The industry has slowly started adding dual-band Wi-Fi chips to higher-end models, though the majority of vacuums sold in 2026 still operate on 2.4GHz only.
Models known to support 5GHz Wi-Fi include select units from these brands and product lines:
- Roborock flagship models like the Qrevo series and some S-series variants
- Ecovacs DEEBOT X2 Omni and T20 Omni in certain regions
- Narwal Freo and Narwal Flow models with updated firmware
- Dreame X30 Ultra and similar premium models
- Some Samsung Jet Bot AI+ models depending on firmware version
If you specifically need a 5GHz-compatible vacuum, check the manufacturer’s spec sheet before buying. Look for the term “dual-band Wi-Fi” or “supports 2.4GHz and 5GHz.” If the specs only mention 2.4GHz, that is all the device will support, regardless of what your router offers.
It is worth noting that even vacuums with 5GHz support often default to 2.4GHz during initial setup. The 5GHz option may only become available after a firmware update or through an advanced settings menu in the companion app.
For most users, I recommend not obsessing over 5GHz support. The 2.4GHz band handles everything a robot vacuum needs. The real challenge is getting your router configured so the vacuum can find and stay connected to the right network.
How to Connect Your Robot Vacuum When You Only Have a Combined SSID
This is where most people get stuck. Modern routers often combine the 2.4GHz and 5GHz bands under a single network name (SSID). The router then automatically assigns each device to whichever band it thinks is best. The problem is that robot vacuums often cannot complete setup on a combined SSID.
The vacuum needs to see a clear 2.4GHz network to pair properly. Here is how to make that happen.
Step 1: Check Your Router Type
Log into your router’s admin panel by typing its IP address (usually 192.168.1.1 or 192.168.0.1) into a browser. Enter your admin username and password. If you have never changed these, check the sticker on the bottom of your router for defaults.
Once logged in, look for a section called “Wireless,” “Wi-Fi Settings,” or “Network.” This is where you will find your band configuration options.
Step 2: Separate Your SSIDs
Look for a setting called “Smart Connect,” “Band Steering,” or “Unified SSID.” This feature combines both bands under one name. Disable it to split the networks into separate SSIDs.
Name them something obvious, like “MyNetwork 2.4” and “MyNetwork 5G.” This makes it easy to tell which band you are connecting to. Now your robot vacuum should be able to see and connect to the 2.4GHz network specifically.
Step 3: Temporarily Disable 5GHz During Setup
If separating SSIDs does not work, try a more aggressive approach. In your router’s wireless settings, temporarily turn off the 5GHz band entirely. This forces every device to use 2.4GHz.
Complete your robot vacuum setup while only the 2.4GHz band is active. Once the vacuum is connected and working, go back and re-enable the 5GHz band. The vacuum will remember the 2.4GHz connection and continue using it.
This trick works because many vacuum apps look for the strongest signal during pairing. With 5GHz disabled, the only option is 2.4GHz.
Step 4: Use the Guest Network Workaround
Some ISP-provided routers hide their band settings or do not allow SSID separation. If you are stuck with one of these, try creating a guest network.
Many routers automatically assign guest networks to the 2.4GHz band. Enable the guest network feature, set a password, and connect your robot vacuum to the guest SSID. This gives your vacuum a clean 2.4GHz connection without interfering with your main network.
Step 5: Mesh Network Specifics
If you use Google Wi-Fi, eero, or another mesh system, the process is slightly different. These systems typically combine bands automatically and do not offer easy separation through their standard settings.
For Google Wi-Fi, use the Google Home app. Go to your Wi-Fi settings, tap your network, and look for the option to create a separate network for smart home devices. Eero users can create an eero Guest Network that often defaults to 2.4GHz.
I have seen mesh users succeed by moving their phone (running the vacuum app) far enough from the nearest node that the phone drops to 2.4GHz. The vacuum then pairs on that band. It is a hack, but it works.
Common Robot Vacuum Wi-Fi Problems and Solutions
Even after you get the 2.4GHz connection sorted, you might run into other issues. Here are the most frequent problems I encounter and how to fix them.
Your Vacuum Cannot Find Any Network
This usually means you are too far from the router during setup. Move the vacuum and your phone within 10 feet of the router, then try again. Make sure you are connected to the same 2.4GHz network on your phone that you want the vacuum to use.
Also check that your router is not using MAC address filtering. If it is, you will need to add the vacuum’s MAC address (usually printed on the device or found in the app) to the approved list before pairing.
The Connection Drops During Cleaning
If your vacuum connects fine but loses connection while cleaning, you likely have dead zones in your home. The 2.4GHz range is good, but it is not infinite. Thick walls, metal ductwork, and large appliances can all create signal gaps.
Consider adding a Wi-Fi extender or access point near the area where the vacuum drops offline. Position it roughly between your router and the dead zone for best results.
VPN or Proxy Interference
If you run a VPN on your phone or your router has a proxy configured, this can block the vacuum from completing its setup handshake. The vacuum app needs to communicate directly with the device during pairing.
Temporarily disable any VPNs on your phone during setup. If your router uses a proxy or custom DNS, switch to standard DHCP and DNS settings until the vacuum is connected. You can usually re-enable these afterward without issues.
Outdated Firmware Causes Pairing Failures
Sometimes the vacuum’s firmware is outdated, causing compatibility issues with newer router protocols. Check the manufacturer’s app for any available firmware updates. Some vacuums can only update after they are connected, creating a frustrating chicken-and-egg situation.
If this happens, try connecting to a mobile hotspot set to 2.4GHz. Update the firmware over the hotspot connection, then switch the vacuum to your home network afterward.
Optimizing Your Wi-Fi Network for Robot Vacuum Performance
Getting your vacuum connected is only half the battle. Keeping the connection stable requires a bit of network optimization. Here are the settings I recommend for the best robot vacuum experience.
Router placement makes the biggest difference. Keep your router in a central, elevated location. Avoid placing it inside cabinets or behind large metal objects. The higher and more central the router, the better the 2.4GHz signal will cover your entire home.
Channel selection also matters on the 2.4GHz band. Channels 1, 6, and 11 are the only non-overlapping channels. Use a free Wi-Fi analyzer app on your phone to see which channel has the least congestion in your area, then set your router to use that channel manually instead of leaving it on auto.
Mesh network users have a slight advantage here. A properly set up mesh system blankets your home in consistent 2.4GHz coverage. Just make sure the mesh nodes are close enough together that the vacuum never loses signal entirely. If the vacuum drops offline mid-clean, it will usually pause and wait for reconnection, but prolonged outages can cause it to abort the cleaning cycle.
One more tip: keep your router firmware updated. Router manufacturers release patches that improve IoT device compatibility and fix bugs that cause random disconnects. Check for updates every few months.
Frequently Asked Questions
How to connect robot vacuum to 5GHz Wi-Fi?
Most robot vacuums cannot connect to 5GHz Wi-Fi because they only have 2.4GHz Wi-Fi chips. To connect to 5GHz, you need a dual-band compatible model from brands like Roborock, Ecovacs DEEBOT premium lines, or Narwal. Check your spec sheet for dual-band support. If your vacuum supports it, separate your router SSIDs and select the 5GHz network during the app setup process.
Why can I only connect to 2.4 GHz but not 5GHz?
You can only connect to 2.4GHz because your device has a 2.4GHz-only Wi-Fi radio chip. This is a hardware limitation, not a software setting you can change. The 2.4GHz band is the industry standard for IoT and smart home devices because it offers better range and wall penetration. No firmware update or app setting will add 5GHz support to a device that only has a 2.4GHz chip.
Which robot vacuum works on 5GHz?
Premium models that support 5GHz Wi-Fi include the Roborock Qrevo series, Ecovacs DEEBOT X2 Omni and T20 Omni, Narwal Freo and Flow, Dreame X30 Ultra, and some Samsung Jet Bot AI+ variants. Always verify dual-band support on the manufacturer’s website before purchasing, as compatibility varies by region and firmware version.
How do I connect to 5GHz instead of 2.4 GHz?
To connect a compatible device to 5GHz instead of 2.4GHz, first separate your combined SSID in your router settings by disabling Smart Connect or Band Steering. Name the two networks distinctly, then select the 5GHz network during device setup. If your device only supports 2.4GHz, there is no way to switch it to 5GHz.
Will using 2.4GHz affect my robot vacuum’s performance?
No, using 2.4GHz will not negatively affect your robot vacuum’s cleaning performance. Robot vacuums send very small amounts of data (location updates, status reports, and maps) that do not require high bandwidth. The 2.4GHz band provides more than enough speed for these tasks, and its superior range means your vacuum stays connected even in far corners of your home.
Conclusion
Understanding why does my robot vacuum only connect to 2.4GHz and not 5GHz comes down to two simple facts: 2.4GHz provides better range and wall penetration, and it is the cost-effective standard for IoT devices. Your vacuum does not need the speed of 5GHz, but it absolutely needs the coverage that 2.4GHz delivers.
If you are stuck during setup, try separating your SSIDs, temporarily disabling the 5GHz band, or using a guest network. For mesh network users, create a dedicated smart home network or use the distance trick to force a 2.4GHz connection during pairing.
The good news is that once your vacuum is connected and configured, the 2.4GHz band will keep it running reliably across your entire home. And if you absolutely need 5GHz support, dual-band models from Roborock, Ecovacs, and Narwal are becoming more common in 2026.
Take it one step at a time, follow the troubleshooting steps above, and your robot vacuum will be online and cleaning before you know it.